
Tips and Tricks When Sewing Transparent Vinyl!
- Tara Rittenhouse

- Sep 19, 2024
- 7 min read
Updated: Sep 20, 2024
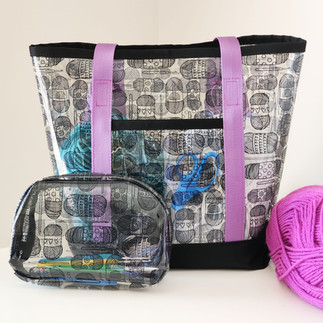
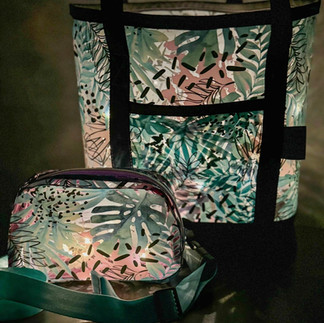
Have you taken the plunge with us in sewing Transparent (clear) Vinyl? With many venues requiring clear bags, and also the popularity of printed clear vinyl make-up pouches and the like rising in retail shops, the inspiration for Transparent projects is everywhere! We at TSM were certainly inspired!


The trouble, though, is that there aren't terribly many patterns designed specifically to Transparent Vinyl, and also, not all Transparent Vinyl is created equal. So, finding tips and tricks from others familiar with the base is extremely helpful. When I set out to sew Transparent for the first time it felt a bit like the first time I had tried sewing athletic fabric after being familiar most with cotton lycra (as far as knits are concerned). An exciting adventure that I was very much looking forward to, but also unsure of what troubles or struggles may lurk in my very near future.
So, as I did when sewing athletics for the first time, I turned to the interweb. I looked for blog posts and tips on what troubles I may encounter, and how to overcome them. I felt prepared to tackle my project, but what I found most fun and exciting was that sewing Transparent kind of allowed me to break some 'rules' and create totally new 'rules'! So, below we are going to go over many tips and tricks for sewing Transparent Vinyl that have been around for a while, tricks that our Test Team found helpful, and also things that Danielle, Alex, and I found helpful as Designers building Transparent Vinyl-specific patterns! We hope by the end you will feel set up for success as you embark on your Transparent Vinyl journey and ready to create something amazing!


To begin, as is often the case, half of the battle when sewing with Transparent Vinyl is to understand our sewing machine. Each machine seems to have its own personality, likes and dislikes. So, a bit of trial and error may be necessary. Try first simply adjusting tension before moving forward to our more "heavy-duty" tricks. You may also find that thread makes a difference. A normal all-purpose thread is best. The heavier threads often cause more friction troubles, which is a big part of the problem when sewing Transparent Vinyl.
Transparent Vinyl is often referred to as having a 'sticky'' nature. It may have difficulty moving across your Throat Plate. The cause of this could be the friction (see, there's that word again!) of trying to glide across the plate itself, getting stuck on the presser foot, or the needle not being able to properly pierce through. If you find that the plate is causing trouble you can try placing tissue paper under your vinyl. This will allow the vinyl to glide without getting stuck. If the tissue paper accidently gets caught in the stitches, it is very easy to simply pull away from the stitches and remove before moving on!


If you find that your presser foot is what is causing the trouble, try using a Teflon foot, Walking foot, or Zipper foot instead! These feet may better allow your vinyl to move through your machine. If you do not have a Teflon foot, try adding a small piece of smooth, non-textured tape to the underside of your zipper foot. You want a piece of tape that will not easily come off and stick to your vinyl, causing an even stickier mess! Washi tape from your craft drawer works very well! (Again, be sure to test on scrap vinyl before moving to your good pieces!)
If you still find that your machine is still struggling, try a new needle. Literally a new needle, not necessarily a new type. Because we are punching tiny holes through solid plastic, our needle may dull somewhat easily. Ensure you have tried a fresh needle. I simply use a universal 80/12 for sewing Transparent Vinyl, if you have trouble with your needle, or are getting skipped stitches, even after changing to a brand-new sharp needle, you may find that a Microtex needle helps.


Once we have our machines set and our test fabric stitches look great, we can move on to actually prepping and sewing our vinyl!


In preparing our vinyl for patterns, we have found that it is important to use a separate pair of scissors or rotary blade to cut Transparent Vinyl than our typical fabric scissors. The Transparent is tough, and has an unforgiving structured nature, which easily dulls scissors. We also want to be sure our vinyl is lying flat prior to cutting. Any waves could affect the shape of the pattern piece, which will cause pieces to not fit properly when sewing later. If you find that your vinyl is not lying flat, you can quickly pass a hairdryer over the vinyl, warming it, then press it flat, or allow it to rest under a heavy book until fully cooled. This will allow the vinyl to reshape, and you to get a consistent cut.
(Small note: When storing your vinyl, be sure to keep it rolled and away from windows or where heat/sunlight could warp it prior to future sews.)
Something I often do, with any pattern, is leave myself all kinds of notes on my actual pattern pieces. Yep, I still use a printer, paper, and a glue stick for my pattern pieces. What comes in really handy for Transparent Vinyl, is that if I made any adjustments to markings, or 'hacks' to my pieces, I can simply lay my piece of vinyl on top of my pattern piece and trace whatever I may need onto my vinyl! So fast and so convenient! One of our testers, the amazing Lynne Zachman, mentioned how well dry erase markers worked for her when making her markings directly on her Transparent Vinyl. This ended up being a brilliant tip! Dry Erase markers wipe away so clean and easy!
To my husband's hardware cabinet's chagrin, my favorite trick for perfect placement on clear vinyl pieces became using painter's tape! This tape allowed me to place my webbing exactly where I needed it, sew it in place, and then remove easily! I did find that some brands of tape seemed to leave a little residue behind, where others did not, but this residue easily wiped clean. I recommend testing the tape on scraps before using on your pattern pieces, just to be safe. This comes in so handy that you'll quickly find yourself adding a roll of painter's tape to your bag-making supplies right alongside your duct tape!


This next tip, y'all are going to love! As I was fighting the earlier stages of design on the Alba Stadium bag I was struggling and struggling to keep my gusset in place along the curves. The vinyl just did not want to stay in place using just clips (even though I had used MANY). It fought and fought to be free and retain its structured shape. After expressing frustration to my fellow designer, Danielle, she said 'what if you tried DST (double sided tape)? You're finishing it with binding, so it'll be hidden!". Well, what a game-changer that was! I slowly eased my gusset into place, removing the DST backing piece by piece as I went, then placing clips to ensure everything stayed exactly where it was meant to be. I took my Alba to the machine and sewed that gusset with so much more ease!


When you finally reach the actual sewing steps, the best tip all of us Designers can give is to go slow. We know that can sound trivial and maybe a little patronizing, but it honestly is such an important part of sewing Transparent Vinyl! It truly has a personality all its own, and patience is key. You also want to test stitch-length prior to sewing your pattern pieces. I use a longer stitch length on my seams than when I sew regular vinyl or faux leather (3.5mm for Transparent vs 3.0mm for traditional vinyl). This allows for clean seams and also better strength to the vinyl. Each hole we punch in the fabric weakens it, and with Transparent, every stitch we make will be visible. Learning to really take my time, stop my machine when approaching a bump, even if tiny, lifting the presser foot, pushing the bump back into shape, and then moving forward ended up being so important. The growth in my patience with this unique base was probably the biggest game-changer in getting a clean finish overall.


This last tip, I have to admit, if I saw this note in a pattern, I probably would say to myself "eh, I'll be fine not doing that....it's silly." But, I have to say this tip is possibly the most helpful of the bunch (aside from patience as mentioned earlier!). Hairdryer. A hairdryer. Have your hairdryer ready! Warming the vinyl comes in handy at so many different points of construction. (Though, it is important to be careful to not pull too hard on your warmed vinyl, as you could distort it.) For example, I found that after sewing one side of my gusset into place and smooshing the vinyl down as I went around the curves, I needed to slightly reshape before sewing the other gusset. (See, the vinyl had kind of frozen in place all smooshed.) So, I gently warmed the vinyl with my hairdryer, reshaped, allowed it to cool and then proceeded to sew the remaining gusset. I did the same when sewing my binding. I also used my hairdryer prior to turning my bag right side out. I would turn halfway, warm again, finish turning, warm, shape to my liking, and then set aside to cool completely. The hairdryer may add a few extra minutes, but it is so, so worth it for the final product.


And that's it! (For now, anyway! It seems we are always learning something new!) We hope these tips help you as you embark on your Transparent Vinyl journey! Transparent Vinyl truly is such a fun base to work with. The possibilities are endless! The finished bags are so eye-catching and fun, and though they look 'simplistic' they elicit a "wow!" response from their new owner. Once you find the 'sweet spot' of your machine and how your vinyl responds, you will be unstoppable!!


Do you have tips that have helped you over time when sewing Transparent Vinyl? We would love to hear them! And please be sure to share your TSM Transparent Vinyl creations with us in our Facebook group!


Thank you for following along with me as I navigate Transparent Vinyl! It's just too fun to not share! I look forward to seeing all of your future creations, so much!
-Tara


Comments